I have been playing a lot of Starcaft 2 lately, and really getting into the entire community. One part of the community that I recently discovered has been live streams of games (some from pros) via sites like justin.tv and ustream.com. There are plenty of articles online talking about how to stream your desktop on Windows based machines, but virtually none on how to do it from a Mac. This article will show how to use Adobe Flash Media Live Encoder (and a couple of other tools) to live stream your desktop to justin.tv (although the setup would also work for other streaming sites).
I am going to divide the article up into a couple of sections. The first part will show how to get a basic desktop stream going, including system sound. The second section will show a more advanced sound setup that allows you to also broadcast your microphone, and audio from other apps such as skype.
Basic Desktop Streaming Setup
The basic setup will allow us to stream our desktop and system audio to justin.tv. This requires the following software:
- Adobe Flash Media Live Encoder (FMLE) 3.2 for Mac : Encodes and streams video and audio to justin.tv
- CamTwist : Used to capture desktop as a video source
- Soundflower : Utility used to capture and redirect system output
- justin.tv config file : Only required if you are streaming to justin.tv (link provided below)
The basic setup is pretty simple, and essentially requires setting up CamTwist to capture your desktop as a video source, and have Flash Media Live Encoder take that video source, combine it with the system audio, and stream it to the server (in this case justin.tv).
A Note on Performance
Keep in mind that encoding and broadcasting live video feeds can be very CPU intensive, and thus may require significant system resources. Depending on what you are streaming, this may affect other applications running on your system, or even the quality of the stream.
Configuring CamTwist
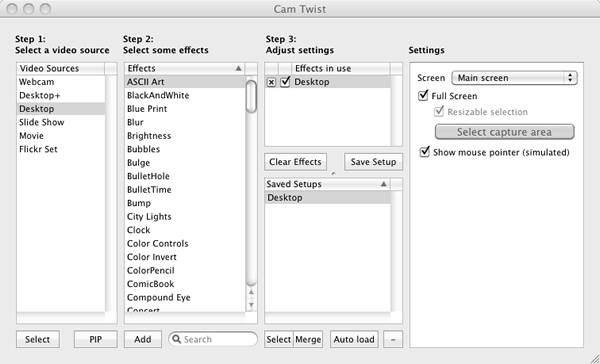
First, download and install CamTwist. Once it is installed, open it up, and under the Step 1 section, double click “Desktop” (not “Desktop+”). “Desktop+” allows you to select a specific window to broadcast, but since we are going to be broadcasting our entire desktop, we will just use the Desktop preset.
You can save these settings by clicking the “Save Setup” button.
Do not select any effects in Step 2.
In Step 3 make sure that “Desktop” is included and checked. In the settings window, make sure that screen is set to “Main Screen”. This ensures that only the main screen will be broadcast (which only matters if you have multiple monitors).
Also make sure that “Full Screen” and “Show mouse pointer (simulated)” are selected.
Once you have set all of these settings, you can save them by clicking the “Save Setup” button.
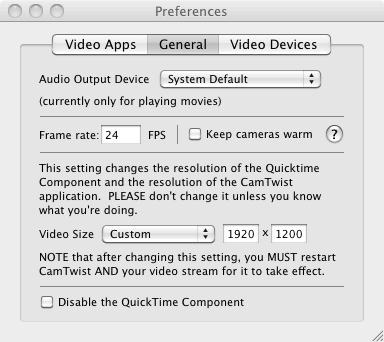
Now, open the preferences (CamTwist > Preferences), and select the “General Tab”. Set the frame rate to the same frame rate you plan to encode at. I am using 24 FPS. The higher the FPS, the smoother the video, but the more bandwidth and CPU required to encode and transmit it.
Set video size to “Custom” and set it to your desktop resolution. In my case, I have it set to 1920 x 1200, which is my native desktop resolution. Set it to the native resolution even if you are going to broadcast at a lower resolution. We will have Adobe Flash Media Live Encoder scale the video down, as my experience has been that it does it much more efficiently than CamTwist.
Once you have set the preferences, close the window and restart CamTwist. Make sure the “Desktop” section is selected. You can test that everything is working by selecting Tools > Preview, which will give you a small preview of the video being captured.
Configuring Audio with Soundflower
In order to capture audio, we need a way to capture the system’s audio output, and make it an input for Flash Media Live encoder. Mac OS X does not have native support for doing this, but the free Soundflower utility enabled this.
Soundflower is a utility that can combine multiple audio outputs and redirect them into a single audio output. We can use this to capture system audio, and pass it on to FMLE to include the audio for our video stream.
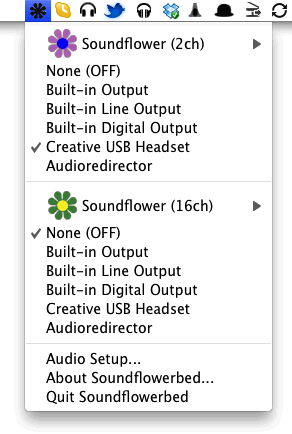
First, download and install Soundflower. Once it is installed, launch it. It won’t open an application window, but will add a small menu item icon (a flower) on the top right of the menu bar.
We need to tell OS X to direct system audio output to Soundflower. Open Sound preferences (System Preferences > Sound > Output) and select “Soundflower (2ch)”.
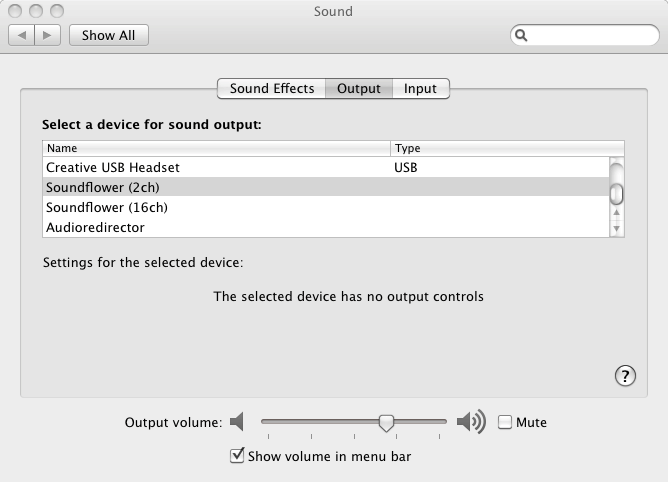
Basically, anything that you would hear through your speakers will now be directed first through Soundflower.
Next, click the Soundflower icon on the menu bar, and for “Soundflower (2ch)” select what you would normally have set as your system output (such as headphone, or Line-Out). This will redirect the audio through Soundflower, and pass it through your normal output so you can still hear it. However, because it is first directed through Soundflower, we can now also use that as an input source in FMLE.
There is a lot more advanced stuff we can do with Soundflower, which we will cover later in the article.
Configuring Adobe Flash Media Live Encoder
Adobe Flash Media Live Encoder (FMLE) is a free tool provided by Adobe that can take a video and audio feed, and create either a VP6 or H.264 encoded video stream that can be streamed to servers and sites such as justin.tv.
Download and install the latest version of FMLE (this article is using version 3.2). If CamTwist is not already running, go ahead and open it. Once FMLE is installed, open it up.
Now, before we start changing settings, we need to first download a config file for our specific justin.tv account. This will include information specific to our account that justin.tv uses to determine which account the stream is associated with. If you are not using justin.tv, you may to skip this section, although you may need to look up docs on how to configure the stream for your specific server.
Log into your justin.tv account, and then visit this page. At the bottom of the page is section for “Flash Media Encoder”. Click the “Config File” button. This is the XML config file for FMLE specific for your justin.tv account. Click the button and download the file to your desktop.
Note : This file will allow anyone who has it to stream to your justin.tv account, so be careful to protect it.
Once you have downloaded the file, we are ready to import it into FMLE. Switch to FMLE and select File > Open Profile. You may get a warning that some tags are not support, and defaults are being used. Just ignore this.
If you look in the output panel on the right side of FMLE, you should see the FMS URL set to something like: rtmp://live.justin.tv/app, and the stream attribute have a value similar to: live_12345678_XXXXXXXXXXXXXXXXXXXXXXXXXXXXXX.
Again, this second string is specific to your account, and will allow anyone to stream to your justin.tv account. You can hide the panel it is shown in (so it wont be displayed on your stream), by selecting “Panel Options” and setting it to “Meta Data” (so the panel wont be displayed). Note that you may need to do this each time your start FMLE.
We are now ready to set up the encoding options for FMLE. First, we will setup the video encoding settings. Some of the settings may vary depending on your system, but I will point out where and why you might want to tweak them.
FMLE : Video Settings
First, in the video panel, make sure that “Video” is checked. For “Device”, select “CamTwist”. If “CamTwist” does not appear as an option, make sure that CamTwist is running and is set to broadcast the desktop. If it isn’t, start it, and then restart FMLE.
Once you have selected CamTwist, you can confirm that it is working by making sure “Input Video” is selected in the “Preview” panel at the top. With this selected, you should see the video feed preview of your desktop.
Next, we need to set the video codec we will be encoding to as well as its options. There is a choice between H.264 and VP6. I am not going to go into a discussion about which is better. In general though H.264 offers higher quality at lower bitrates, with slightly higher CPU usage, while VP6 offers lower quality, with higher bitrates and slightly lower CPU usage. For this article, I will be using H.264 to stream to the server.
Select “H.264” as the Format, and click the little wrench icon. This will open a panel where we can set additional setting specific to the codec.
Set the profile to “Main”.
The “Level” value will vary depending on the resolution you will be encoding at. In our case, I will be encoding at 720p (1280 x 720) at 24 FPS, so I need to set the level to “3.1”. You can find a list of levels and resolutions / FPS in the H.264 wikipedia article.
Finally, we need to set the Keyframe Frequency. This determines how frequently keyframes (complete captures of the image) are inserted into the stream. We will use the default of “5”.
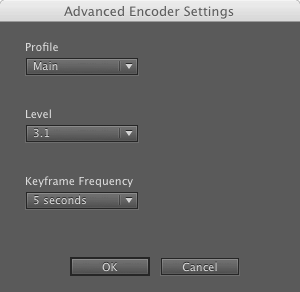
Once you have set the codec settings, click the “OK” button.
Back in FMLE, set the Frame Rate to “24.00” fps. Higher frame-rates provide smoother video, but require more CPU and bandwidth. Lower frame-rates provide choppier video, but require less CPU and bandwidth. I think that 24 FPS is a good middle ground, but feel free to experiment. Just remember that if you change this, you should also change it in the CamTwist preferences, so they are the same.
Set “Input Size” to the size that you will be broadcasting / encoding at. We do this, even though the input received from CamTwist is a higher resolution. FMLE will scale the video to the appropriate size. It has been my experience that this uses less CPU that having CamTwist do the scaling.
We could set input size to the full resolution of the input stream, and then have the output size as a scaled down stream. However, in my case, i have a 16:10 stream resolution which FMLE currently doesn’t support, which would result in part of the stream being chopped at the top and bottom. By having the scaling done at the Input Size, I was able to get the content scaled correctly, without having any part of the stream cropped. (If anyone has more feedback on this, please post it in the comments.).
Make sure that “Maintain Aspect Ratio” is also checked for “Input Size”. This prevents the video from being skewed when it is scaled.
Now, FMLE can encode and output multiple streams and sizes (which I believe justin.tv supports), however, we will just be broadcasting one stream.
Make sure the first stream is checked, and set the “Bit Rate” to “1000mhz kbps. This setting basically specifies how much data is included in the stream. The higher the value, the clearer the image (less compression) and the more bandwidth required. The main thing to consider when setting this is how much upstream bandwidth you have available. You can get a general idea by doing a speed test and looking at the upload results. On the right of the stream section in FMLE, will be an estimate of the total bandwidth required to stream at the current setting. You want to make sure that you have some buffer between what you are sending, and what your upstream bandwidth is. Otherwise, viewers of your stream may see frequent drops and stutters.
To start with, I would set it at 1000, test, and then move the value up (in increments of 500) until you find a good balance between bandwidth usage and video quality.
Set the “Output Size” to the output size you want to stream at. For this article, we will be streaming at 720p (“1280 x 720p), which is a standard HD resolution, and I feel provides a good tradeoff for providing high quality stream for the bandwidth required. Again, adjusting the resolution will affect the amount of bandwidth required for the stream.
You can leave both “Deinterlace” (since we are running at 720p) and “Timecode” unchecked.
FMLE : Audio Settings
Audio settings are a bit less involved than video settings, and mostly requires finding a balance between quality and bandwidth required.
Make sure that “Audio” is checked at the top of the Audio section.
For “Device”, select “Soundflower (2ch)”. If this does not appear, make sure Soundflower is running. If it is not, start it and restart FMLE.
Once it is set, you can test that is is working by checking “Audio” in the preview panel and thenm play an audio source on your system. You should see the audio levels reflected in the preview panel (on the right). You should also be able to hear the audio through your headphones / speakers. If you don’t, make sure that you have set the output correctly in Soundflower (see above).
For Format, select “Mp3, and set “Channels” to “Stereo” and “Sample Rate” to “44100mhz.
The “Bit Rate” setting determines how much data is used to encode the audio. Higher values mean clearer audio / less compression but require more bandwidth. Unless you are streaming high quality audio / music, then 128 Kbps should be fine, and depending on your bandwidth, you may want to set it slightly lower.
Turn the volume all the way up.
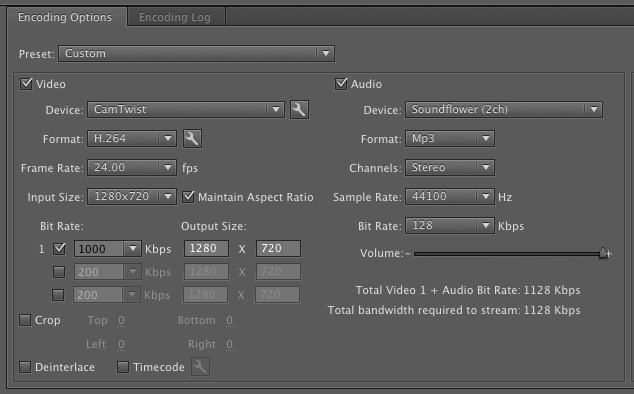
At this point, look at the bandwidth required estimate under the Volume setting. Make sure this is not too high in relation to your upstream bandwidth. You want to ensure there is some padding for data spikes, or if your available bandwidth goes down a bit. If the bandwidth required is too high, then go through and tweak the settings (see above) until you get the bandwidth to an acceptable level. You may need to do some live testing to find the best compromise between audio / video quality and required bandwidth.
Now that we have entered all of the settings, we want to save our FMLE profile, so we can easily use it again. Select File > Save Profile and save the profile onto your system. By default, FMLE will open with the last settings used, but you can also open the saved profile by going to File > Open Profile.
All that is left to do, is to start the stream, and make sure everything is working with justin.tv. Click the green “Start” button and switch over to your justin.tv channel. You should see your desktop and audio being streamed on your channel (there may be some delay between your desktop and the playback on the stream).
Make sure audio and video quality are good. If they are not, then stop the stream, tweak the settings and try again.
If you run into any errors, just check the “Encoding Log” panel in FMLE (which will open when you start the stream). You can also get general statistics on your stream in the Encoding pane which can be useful for trying to track down issues.
General Trouble Shooting
Audio Not working
If audio is not working, make sure:
- Soundflower is running
- Soundflower was launched before FMLE was opened
- Soundflower is set correctly as the Output in system Sound preferences
- Try stopping and starting the stream in FMLE
If audio is working on stream, but not locally, make sure that:
- Correct output is set in Soundflower
Video not working
If the video stream is not working:
- Make sure that CamTwist is running, and is configured to output the desktop
- Make sure that CamTwist was started before FMLE was started
- Make sure that Video is selected in FMLE
- Make sure you you downloaded and loaded the justin.tv config file
- Try stopping and starting the stream in FMLE
If video is choppy on justin.tv
- Adjust audio and video settings in FMLE
- Video output resolution
- Video output Bit Rate
- Audio output Bit Rate
- Increase Keyframe interval for H.264
- Check system resources (view in Activity Monitor) and make sure your system has enough resources to encode and stream audio in real time
- Close any applications not necessary to streaming
- Turn off “Video Input”, “Video Output”, and “Audio” previews in FMLE.
Advanced Configuration for Streaming your desktop on Mac OS X
The information above is all you need if you just want to stream your desktop and system audio to a remote server (such as justin.tv). However, if you want be able to also stream your microphone input or entire skype calls / conversations, then there are a couple of more steps you need to take.
For this section, we will be using all of the software above, along with:
- LineIn : Allows you to redirect system audio inputs to audio outputs.
By using LineIn, in conjunction with the applications above, you can have very advanced control over how you mix your audio on the desktop, including which audio outputs are included in your stream, and on your desktop.
For this example, we will be setting up our system so that:
- Microphone input is included in the stream, but not included in the local system output
- Skype conversations (both local and remote) are included in the stream
First, download LineIn, and copy it to your applications folder. We are going to need to use two instances of LineIn, and since Mac OS X will only allow us to launch one instance of an app at a time, we need to make a copy of the app and rename it. So, copy the LineIn application, and rename the copy to LineIn2.
Launch both LineIn and LineIn2 (their windows may overlap when they launch).
One feature of Soundflower which we did not discuss above, it that it creates two separate output channel (one with 2 channels, and one with 16 channels). We can use this, in conjunction with LineIn, to provide different audio feeds for the desktop and the stream.
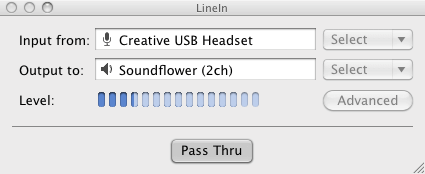
In the first LineIn window, set the “Input from” to your local microphone input. Then, set the “Output to” “Soundflower (2ch)”. This basically takes the input from your microphone, and redirects it to the Soundflower (2ch) output (being used by FMLE).
Next, click the “Pass Thru” button to enable the changes we just made.
At this point, if you have configured your streaming according the the instructions above, your microphone input will now be included in the audio for your stream. However, if you test this, you will also notice that the microphone input is also output to your system audio (since system Sound output is set to Soundflower (2ch)). Hearing yourself in your speakers / headphone as you speak can be very confusing and distracting (not to mention annoying), so we need to configure things so microphone input is not output locally.
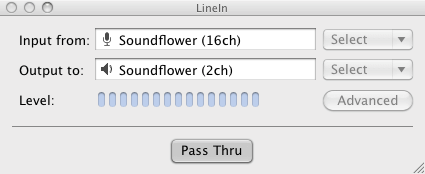
This is where the second instance of LineIn comes in. If you haven’t already, launch LineIn2. Set the “Input from” to “Soundflower (16ch)” and set the “Output to” to “Soundflower (2ch)”. Once you have done this, click the “Pass Thru” button to enable the changes.
Next, we need to set all system audio output to go to “Soundflower (16ch)”. Open system Sound Output settings (System Preferences > Sound > Output) and set output to “Soundflower (16ch)”. Now, all system audio output will go to “Soundflower (16ch)”, which is then being redirected (by LineIn) to “Sunflower (2ch)”.
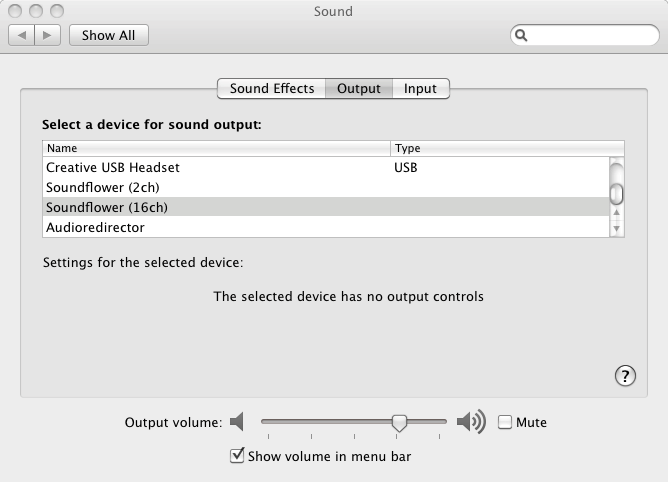
At this point, we now have two separate Soundflower channels. One (“Soundflower (2ch)”) includes both system audio and microphone input, and one (“Soundflower 16ch”) includes all system audio, minus the microphone input.
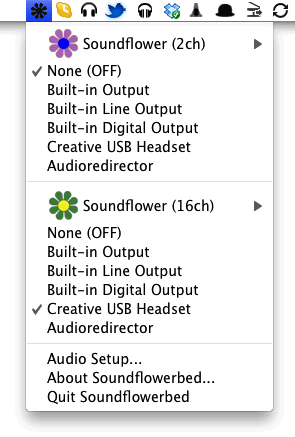
We don’t need to change anything in FMLE, since it is already set to use Soundflower (2ch) as its audio input. However, in order to hear the correct audio locally, we need to change the Soundflower local output. Click the Soundflower icon on the menu bar. Set “Soundflower (2ch)” to “None (Off)”, and set “Soundflower (16ch)” to the local output you want to use (which ever output your speakers / headphone is connected to).
You should now be able to hear all system audio locally without hearing the microphone. However, the stream includes the audio from both the local system and microphone.
At this point, anything you output to “Soundflower (16ch)” will be included in the stream (and played locally). This means you can set other applications, such as Skype, to also output to Soundflower (16ch) in order to include them in the stream.
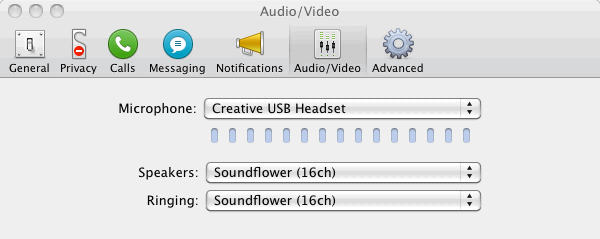
Configuring this in Skype is easy. Just open Skype, and launch the Audio / Video preferences (Skype > Preferences > Audio / Video). Set the “Speakers” to “Soundflower (16ch)” and close the preferences. Now any audio that comes through Skype, will be included in the stream.
You can do this with any application that allows you to specify sound output. You just need to keep in mind that you only have 16 channels total (which should be plenty).
With this setup, you can stream your desktop, system audio, local microphone and skype conversations all of the same time (useful, for example, if you are streaming multiple player games while playing / chatting with friends).
Conclusion
While setting up desktop streaming on Mac OS X can seem a bit daunting at first, it is not too difficult. Once you do get it setup with the configuration describe in this article, you have a lot of flexibility in how things are broadcast, including which audio sources are included / excluded.
Additional Resources
Applications
Articles / Resources
- Beginners Guide to Desktop Streaming : Great walkthrough for streaming your desktop from Windows
- Using CamTwist with Justin.tv
- Adobe Flash Media Live Encoder Documentation
- How To Make Your Own Web TV Show : Great video series by Sean “Day9” Plott.
- Justin.tv forums
- Adobe Flash Media Live Encoder Forums
- TeamLiquid Forums Stream Quality Guide
If you have any questions or suggestions, then post them in the comments.